Machine Learning : Introduction to Convolution Neural network
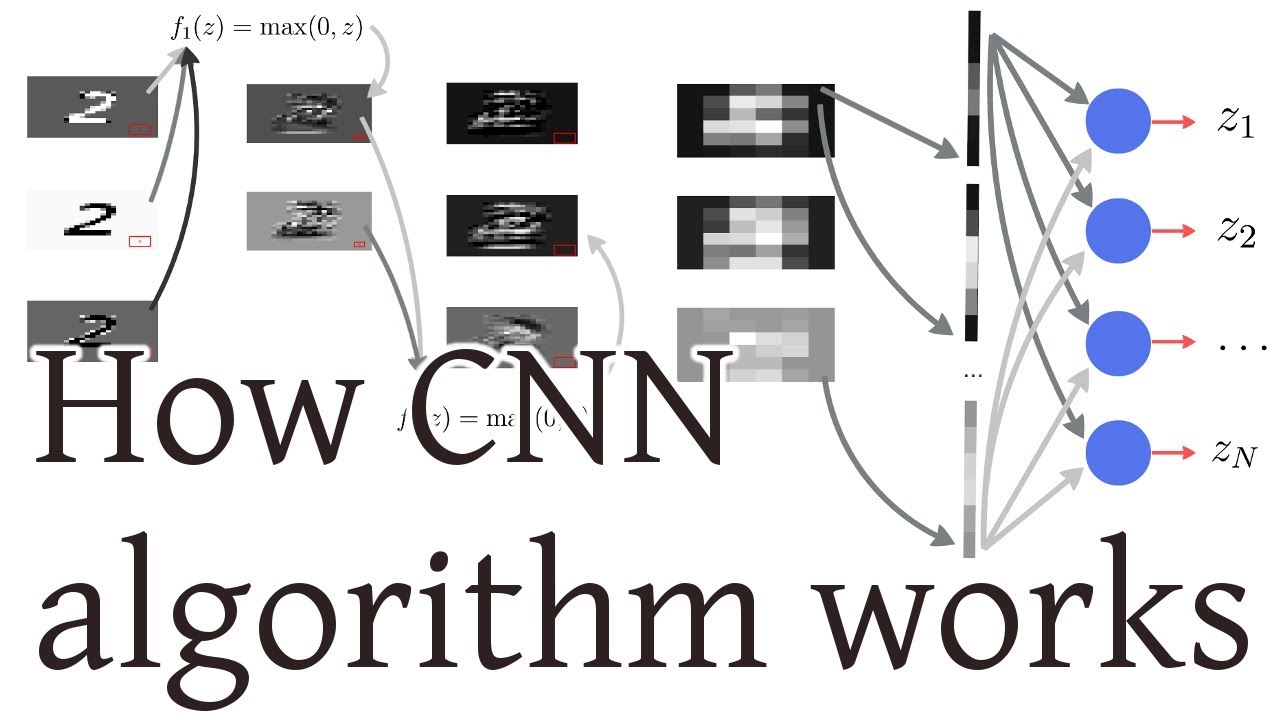
What is CNN
Class of Deep learning commonly applied in computer vision and image processing. CNNs use relatively little pre-processing compared to other image classification algorithms. This means that the network learns the filters that in traditional algorithms were hand-engineered. This independence from prior knowledge and human effort in feature design is a major advantage.
Steps to make a cnn model to classify wether in image there is dog or cat:
Github link for dog/cat classifier link?
-
Convolution operation
-
Relu Layer
-
Pooling
-
Flattening
-
Full Connection
-
optimisation of loss function
Python code block:
    from keras.models import Sequential#to initialise our neural network
    from keras.layers import MaxPooling2D
    from keras.layers import Flatten
    from keras.layers import Dense#to add fully connected layer to our neural neetwork
    from keras.layers import Convolution2D
Step1 To initialise the cnn model in this we stack layer sequentially
classifier = Sequential() #to initialise
Step2 Then after that we do convolution of the image matrix with the feature detector in this i have taken feature detector of 32*32 and 3 there for RGB color. Relu is used as a non-linear activator for image detection as we want to break linearity.
classifier.add(Convolution2D( 32,32,3, input_shape=(64,64,3), activation='relu'))
Step3 Now comes the pooling as we want to decrease the size of our input image as only some features of the image are useful to us so we will apply max pooling with 2*2 matrix.
classifier.add(MaxPooling2D(pool_size=(2,2)))
Step4 To convert our matrix into vector to make it input into our neural network we do flattening.
classifier.add(Flatten())
Step5 Now comes the portion of making full connection we use Dense function to do it
classifier.add(Dense(output_dim = 128,activation = 'relu'))
Step5 As we only need to classify only two wether cat or dog we have used sigmoid function
classifier.add(Dense(output_dim = 1,activation = 'sigmoid'))
To improve our accuracy we need to decrease our loss function so i have compiled it for 25 times This tempelate is taken from keras documentation under image preprocessing section for augmentation purpose so that our model recognises the image correctly even if the image is distorted or misoriented. It helps us to gain more information from some amount of data
from keras.preprocessing.image import ImageDataGenerator
train_datagen = ImageDataGenerator(
        rescale=1./255,
        shear_range=0.2,
        zoom_range=0.2,
        horizontal_flip=True)

test_datagen = ImageDataGenerator(rescale=1./255)

training_set = train_datagen.flow_from_directory('dataset/training_set',target_size=(64, 64),batch_size=32,class_mode='binary')

test_set = test_datagen.flow_from_directory('dataset/test_set',target_size=(64,64),batch_size=32,class_mode='binary')

classifier.fit_generator(
        training_set,
        steps_per_epoch=8000,
        epochs=25,
        validation_data=test_set,
        validation_steps=800)
Here’s an image:
Here’s another image using Kramdown:
